Volkswagen Golf Service & Repair Manual: Removing and installing bumper cover
| Volkswagen R GmbH, optional equipment, “R Line” and “R” |
| Special tools and workshop equipment
required |
|
|
|
 Note Note
| The removal and installation procedures for front bumper
cover may have to be revised slightly depending on model
variations. |
|
|
Torque wrench -V.A.G 1783- |

| – |
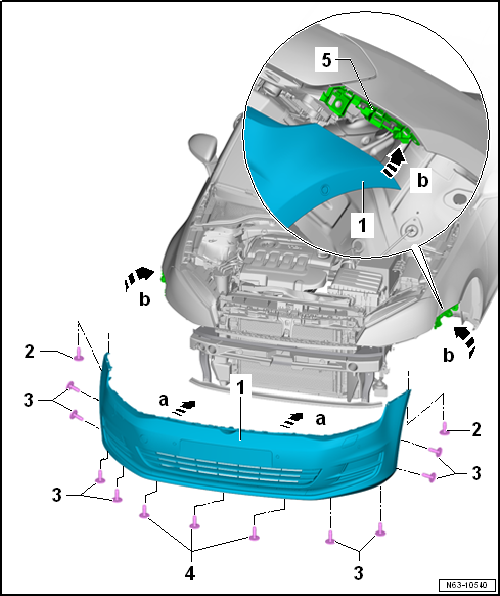
Removing radiator grille
→ Chapter |
| – |
Undo bolts -2- in wheel housing
(pointing upwards) on left and right. |
| – |
Unscrew bolts -3- on left and right. |
| – |
Unscrew bolts -4- from underneath. |
| Further dismantling requires the assistance of a second mechanic. |
| – |
Pull bumper cover -1- out of guide
fasteners on left and right of wing -arrows a-. |
| – |
Release locking hooks -arrows b- from
lock carrier. |
| – |
Pull bumper cover -1- off vehicle in
parallel movement -arrows c-. |
| – |
Detach washer fluid line hose couplings (if there are any)
→ Electrical system; Rep. gr.92. |
| – |
Separate connectors of electrical components (if present). |
| General information and work instructions for the parking aid can be
found in
→ Electrical system; Rep. gr.94. |
| General information and work instructions for the Park Assist system
can be found in
→ Electrical system; Rep. gr.94. |
| Further installation requires the assistance of a second mechanic. |
| – |
Connect connectors of all installed electrical components. |
Note
| When positioning the bumper cover, make sure that the front wheel
housing liner is correctly seated. |
| – |
Guide bumper cover -1- onto lock
carrier -arrows a- in a parallel movement
until locking devices engage. |
| – |
Press bumper cover -1- onto guides
-5- on left and right of wing until they
engage with each other -arrow b-. |
| – |
Observe gaps/shut lines
→ Rep. gr.00. |
| |
→ Chapter „Assembly overview - bumper cover“ |
Repairing bumper cover
Note
| If bumper cover is damaged, determine whether plastic can be
repaired before renewing bumper. |
| Description under:
→ General Information; Body Repairs, General Body Repairs |
|
|
|
1 -
Impact bar
2 -
Guide bracket
Left and right
3 -
Hexagon nut
Qty. 2 on each side
2.0 Nm
...
Special tools and workshop equipment
required
Installation tool for PDC bracket -VAS 6 ...
Other materials:
Gear-change indicator
Fig. 140 In the instrument cluster display:
gear-change indicator
First read and observe the introductory information
and safety warnings The instrument cluster display may, depending on the
vehicle's equipment level, indicate which gear should be selected to reduce fuel
consumption ...
Removing and installing front airbag crash sensor, driver side -G283-
Removing
WARNING
Observe safety instructions for pyrotechnic
components
→ Chapter.
Risk of injury due to automatic engine starting in
vehic ...
Rear brakes
The type of brake system installed in the vehicle is
indicated among other things by the corresponding PR number on
the vehicle data sticker.
The vehicle data sticker can be found in the spare wheel
well and in the service schedule.
...
© 2016-2024 Copyright www.vwgolf.org

 Assembly overview - impact bar
 Installing brackets for parking aid system