Volkswagen Golf Service & Repair Manual: Removing and installing air distribution housing
 Note Note
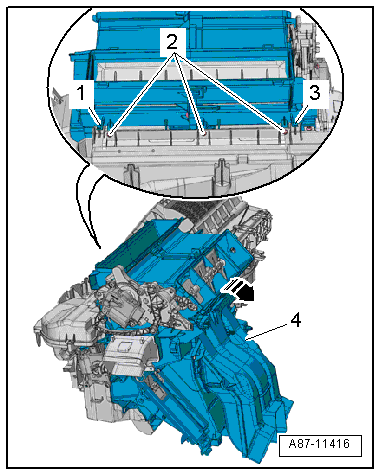
| The illustration shows a left-hand drive vehicle. The
removal and installation procedure is identical for both
versions. |
|
|
|
| – |
Remove heater and air conditioner unit
→ Chapter. |
| – |
Remove the coolant pipes at the heat exchanger
→ Chapter. |
| – |
Disconnect electrical connector on fresh air and air
recirculation flap control motor and lay wiring harness to one
side. |
| – |
Release retaining tabs -1- and
-3-. |
| – |
Swivel the air distribution housing
-4- to the rear -arrow- and
disengage. |
| Installation is carried out in the reverse order. When
installing, note the following: |
| → Chapter „Dismantling and assembling heater and air
conditioning unit“ |
Note
| Even minute leakage at the tongue-and-groove joint between
the air distribution housing and the evaporator housing can lead
to whistling noise as a result of escaping air. Therefore
lightly coat joints with silicone grease to fully seal the
joints. Silicone grease
→ Electronic Parts Catalogue. |
|
|
|
Note
There are different designs and makes of heater and air
conditioning unit. The individual components of the various
heaters and air conditio ...
Note
Leave the holders in the vehicle on removing the heater and
air conditioning unit. The illustration shows a left-hand drive
vehicle.
...
© 2016-2024 Copyright www.vwgolf.org

 Dismantling and assembling heater and air conditioning unit
 Removing and installing holder for heater and air conditioning unit