VW Golf manuals

Volkswagen Golf Service & Repair Manual: Removing and installing air distribution flap control motor -V428-, RHD vehicles

Volkswagen Golf Service & Repair Manual / Heating, air conditioning / Air conditioner / Control motors / Removing and installing air distribution flap control motor -V428-, RHD vehicles

Special tools and workshop equipment required
Vehicle diagnostic tester
First carry out the following work:
–  Switch off all electrical consumers.
–  Switch off ignition.
–  Remove ignition key.
Removing
–  Remove glove compartment → General body repairs, interior; Rep. gr.68.
   
–  Remove bolts -2-.
–  Pull off front air distribution flap control motor -V426--1- and remove it.
–  Disconnect electrical connector -3-.
Installing
Installation is carried out in the reverse order. When installing, note the following:
  Note
Check operation of flaps and hinge mechanism before fitting.
Make sure levers and shafts are properly fitted in the mounts.
 

Removing and installing air distribution flap control motor -V428-, RHD vehicles

–  Receptacle of control motor -1- can be fitted on actuating arm -2- in only one position.
The receptacle of the control motor must align with the actuating arm as shown in illustration.
  Note
Rotate the receptacle in the control motor if the mount and actuating arm do not align.
–  Switch on ignition, connect respective control motor to vehicle wiring harness and select a setting on operating and display unit to set control motor to desired position (e.g. mid-position). Wait until control motor has moved to desired position and switch off ignition.
–  Fit control motor on air intake box. The actuating arm must engage in receptacle -1--arrow- while doing so.
There must not be any play in the connection between control motor and actuating lever.
  Note
If the bolts cannot be fitted, the control motor is not completely seated on the housing.
–  Route wiring harness so that it cannot come into contact with any moving parts (e.g. actuating arm on control motor).
  Note
Rotate control motor until it reaches a convenient position for installation. The direction of rotation can be changed by changing polarities.
–  Read event memory, and clear any entries displayed. Then, perform “basic setting”vehicle diagnostic tester in “Guided fault finding” mode.
–  As a final step, check operation of heater and air conditioning system.
Specified torque
→ Chapter „Assembly overview - heater and air conditioning unit“
Compartments/covers; Assembly overview - glove compartment → General body repairs, interior; Rep. gr.68.
 

Removing and installing air distribution flap control motor -V428-, RHD vehicles

Removing and installing air distribution flap control motor -V428-, LHD vehicles
Special tools and workshop equipment required Vehicle diagnostic tester Removing –  ...

Removing and installing front air distribution flap actuation unit, heater and air conditioning system with electric/manual controls, LHD vehicles
Removing –  Remove dash panel → General body repairs, interior; Rep. gr.70. –  Remov ...

Other materials:

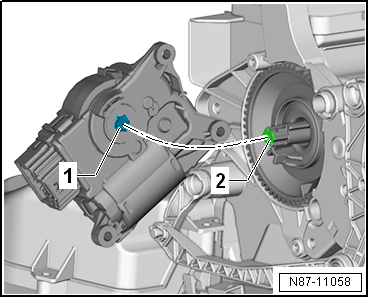
Removing and installing engine speed sender -G28-
Special tools and workshop equipment required     Socket AF 4 mm -T10370- Removing –  Remove noise insulation → General body repair ...

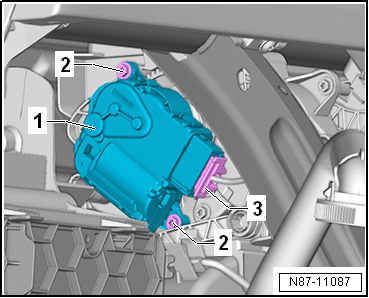
Overview of fitting locations - front control motors, RHD vehicles
1 -  Air recirculation flap control motor -V113- Checking: with vehicle diagnostic tester Removing and installing → Chapter Renewing: initiate basic setting using vehicle diagnostic tester. 2&nbs ...

Assembly overview - fuel delivery unit/fuel gauge sender, vehicles with front-wheel drive
1 -  Fuel delivery unit With fuel system pressurisation pump -G6-. With integrated fuel filter; cannot be renewed individually. With integrated pressure limiting valve; cannot be renewed individually. C ...

© 2016-2024 Copyright www.vwgolf.org