VW Golf manuals

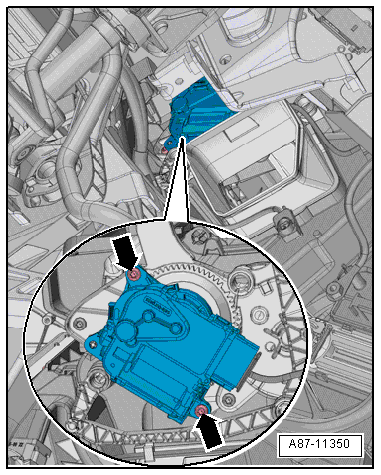
Volkswagen Golf Service & Repair Manual: Removing and installing air distribution flap control motor -V428-, LHD vehicles

Volkswagen Golf Service & Repair Manual / Heating, air conditioning / Air conditioner / Control motors / Removing and installing air distribution flap control motor -V428-, LHD vehicles

Special tools and workshop equipment required
Vehicle diagnostic tester
Removing
–  Remove dash panel → General body repairs, interior; Rep. gr.70.
–  If fitted, remove interface for entry and start system -J965- → Electrical system; Rep. gr.94.
–  Remove footwell vent on driver side → Chapter.
   
–  Unscrew bolts -arrows-.
  Note
The bolts are accessible from underneath behind the central tube.
Use a magnetic screwdriver to unscrew the bolts or have a second mechanic hold a magnet over the bolt. If the bolt drops out it will fall out of reach into the duct trough.
–  Pull off air distribution flap control motor -V428--4- and remove it.
–  Disconnect electrical connector -1-.
Installing
Installation is carried out in the reverse order. When installing, note the following:
  Note
Check operation of flaps and hinge mechanism before fitting.
Make sure levers and shafts are properly fitted in the mounts.
 

Removing and installing air distribution flap control motor -V428-, LHD vehicles

–  The mounting of control motor -1- can only be fitted on actuating arm -2- in one particular position.
The mounting of the control motor must be opposite to the actuating arm as shown in illustration.
  Note
Rotate the receptacle in the control motor if the mount and actuating arm do not align.
–  Switch on ignition, connect respective control motor to vehicle wiring harness and select a setting on operating and display unit to set control motor to desired position (e.g. mid-position). Wait until control motor has moved to desired position and switch off ignition.
–  Fit control motor on air intake box. The actuating arm -2- must engage in mounting -1- while doing so.
There must not be any play in the connection between control motor and actuating lever.
  Note
If the bolts cannot be fitted, the control motor is not completely seated on the housing.
–  Route wiring harness so that it cannot come into contact with any moving parts (e.g. actuating arm on control motor).
  Note
Turn the control motor until it reaches a convenient position for installation. The direction of rotation can be changed by changing polarities.
–  Read event memory, and clear any entries displayed. Then, perform “basic setting”vehicle diagnostic tester in “Guided fault finding” mode.
–  As a final step, check operation of heater and air conditioning system.
Specified torque
→ Chapter „Assembly overview - heater and air conditioning unit“
Dash panel; Assembly overview - dash panel → General body repairs, interior; Rep. gr.70.
 

Removing and installing air distribution flap control motor -V428-, LHD vehicles

Removing and installing front air distribution flap control motor -V426-, RHD vehicles
Special tools and workshop equipment required Vehicle diagnostic tester First carry out the following work: ...

Removing and installing air distribution flap control motor -V428-, RHD vehicles
Special tools and workshop equipment required Vehicle diagnostic tester First carry out the following work: ...

Other materials:

Cigarette lighter, socket
Removing and installing cigarette lighter -U1-   Note All instructions and notes regarding this chapter are available under → Electrical System, General Information; Rep. gr.96.   &nb ...

Removing and installing washer jets
Removing   Note Removal and installation are described for the left side. Removal and installation on the right side are carried out in the same way. –  Open bonnet.   & ...

After purging refrigerant circuit of contaminants, e.g. due to moisture intrusion (because refrigerant circuit has stood open for a length of time) or due to dirt
The reservoir or receiver or cartridge of the dryer bag need not be renewed under the following circumstances: After an accident in which there was no damage to the reservoir or receiver. Repairs are performe ...

© 2016-2024 Copyright www.vwgolf.org