Volkswagen Golf Service & Repair Manual: Information on wheel rims
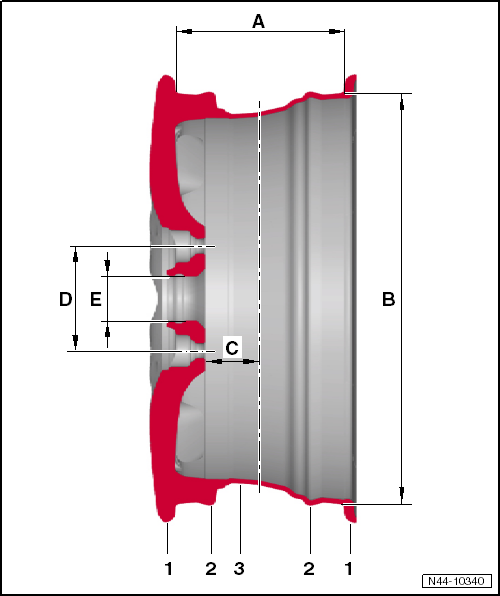
| Stop for tyre side beading |
| 2 - |
Hump (H2) on both shoulders of rim |
| Prevents the tyre slipping off the shoulder of the rim while driving
through tight bends |
| Extended hump (EH2) - prerequisite when using tyres with run-flat
properties
→ Chapter |
| Eases fitting/removal of tyre |
| Distance between tyre contact surfaces on both rim edges of wheel |
| Distance between tyre contact surfaces on opposite tyre shoulders |
| Vertical distance between centre of wheel and wheel inner contact
surface |
| D - |
Pitch circle diameter |
| Diameter of circle for wheel bolt holes |
| There are several items of information on rims. The following
example shows the information needed for clear identification of the
rim: |
| Part number: |
6E0 601 027 A |
| Wheel size: |
6 J x 15
6 - Rim width in inches
J - Shape of wheel rim flange
15 - Rim diameter in inches |
| Wheel offset in mm: |
43 |
| Data on hump of rim shoulder: |
EH2
Extended Hump 1) |
| 1) Raised round hump on both rim
shoulders. These ensure that when run-flat tyres are used without air
pressure, they will not slip from rim shoulder. EH2 wheel rims are
required only if run-flat tyres are fitted
→ Chapter! |
| Split rim alloy wheels consist of several parts. |
| The major parts are the rim and the wheel centre. These
parts are bolted together with special bolts using a special
process. This ensures that the wheel functions properly, that it
is sealed and safe and that it runs true. These requirements are
not guaranteed with workshop materials and under workshop
conditions. |
 WARNING
| You must not dismantle or repair composite wheels! |
|
|
| Care and maintenance of alloy wheel rims |
| Regular care is required to maintain the decorative
appearance of alloy wheels over a long period of time. |
| In particular road salt and dust from brake abrasion must be
thoroughly washed off every 2 weeks; otherwise the finish of the
alloy wheel will suffer. |
| Suitable cleaning agents: |
| Plain water or water with soft soap |
| Water and essence of vinegar |
| Alloy wheel cleansers without acids or strong solvents |
| Do not exceed the soaking time of the cleaning agent. |
| The shorter the recommended soaking time, the harsher and
more aggressive the cleaning agent. |
| If the finish is damaged, for example by stones, the damage
must be repaired as quickly as possible
→ Chapter. |
| Removing adhesive residue from glued balance weights on
alloy rims |
| Strong solvents and acids attack the finish on alloy wheels
and the surface of the wheel becomes matt and milky. Therefore,
these substances should not be used. |
| To remove adhesive residue on alloy wheels, use alloy
cleansers or a petrol-based cleanser. Do not exceed the soaking
time of the cleaning agent. |
| After cleaning or removing adhesive residue from wheels,
rinse them with water. |
|
|
|
WARNING
| Repairing a damaged wheel using heat treatment such
as welding or the addition or removal of material is
absolutely forbidden. |
| Damaged or deformed wheel rims or wheel rims with
cracked or deformed wheel bolt holes may not be
repaired. |
| Restoration may only be undertaken using approved
and genuine paint materials. |
| The manufactures guarantee no longer applies once a
wheel rim has been restored. |
|
| Wheel rims with cracks along the edges may not be repaired
and must be replaced immediately. |
| Remachining, heat treatment and welding of all types is not
permitted. |
| Material reforming is not permissible. |
| Before restoring, the radial runout and lateral runout must
not exceed the manufactures tolerance of 0.8 mm. |
| Only cast alloy wheel rims may be filled using a filler
putty. These wheels have the material identification AlSi xx
stamped in the inner side. |
| Forged wheels may not be painted. |
| The restoration is limited to the painted surfaces. |
| Bright machined wheels, which only have a clear coating, may
not be repaired. |
| Only surface damage on the viewed side (design surface) of
the wheel may be restored. |
| Restoring a damaged surface depth of 1 mm must not be
exceeded. |
| Only up to 50 mm may be removed/ filler filled on the outer
boss. |
|
|
|
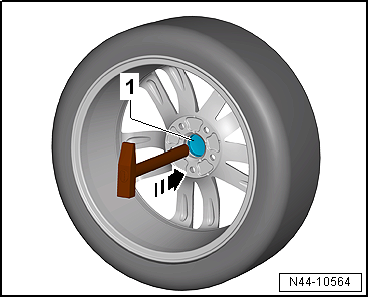
Removing and installing hub cover for alloy wheels with open threaded
connection
 Note Note
|
|
|
| Hold cover cap -1- when driving
out with hammer. |
|
|
|
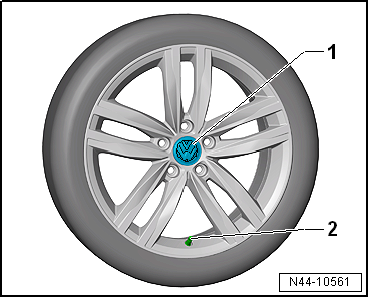
| – |
Hold cover cap -1- flush
against opening in alloy wheel rim. |
| – |
Align the Volkswagen emblem on the cover cap to the tyre
inflation valve so that the emblem seats centrally over the
valve -2-. |
| – |
Apply light hand pressure until the cover cap is pushed into
the opening of the alloy wheel rim and is secure. |
| – |
Check cover cap has no play and that it is seated correctly
in the alloy wheel rim. |
|
|
|
The graph shows the temperature development of a tyre at a
speed of 180 km/h.
A -
When specified tyre pressure is maintained, the tem ...
Other materials:
Emptying fuel tank if it is less than 3/4
full
Special tools and workshop equipment required
Removal wedge -3409-
Wrench -T10202-
Torque wrench -V.A.G 1332-
Fuel extractor -VAS 5190-
Fuel extractor -VAS 5190 A- for E 85 fuel (not shown).
&nb ...
Balancing wheel, balancing wheel on stationary wheel balancer
Road test has been carried out
→ Chapter.
Clamp wheel into wheel balancing machine
Note
When balancing tyres, please remember that cleanliness is
absolutely essential, as is the case in an ...
2-pack clear coat
Designation:
2-pack clear coat -LLS MAX 210-
Issued 12.2010
Product description
The 2-pack clearcoat -LLS MAX 210- is a high-gloss
2-component clear coat for the permanent se ...
© 2016-2024 Copyright www.vwgolf.org

 Increase in temperature due to insufficient tyre pressure