Volkswagen Golf Service & Repair Manual: Draining and filling coolant
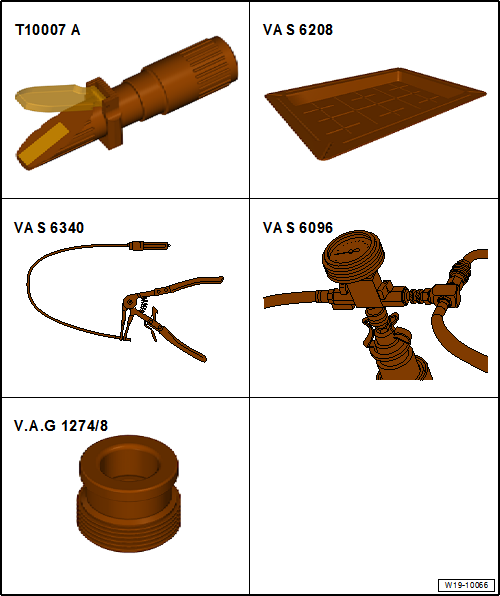
| Special tools and workshop equipment required |
| Drip tray for workshop hoist -VAS 6208- |
| Hose clip pliers -VAS 6340- |
| Cooling system charge unit -VAS 6096- |
| Adapter for cooling system tester -V.A.G 1274/8- |
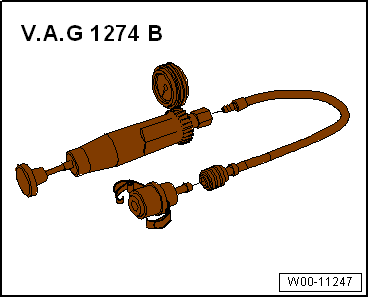
| Cooling system tester -V.A.G 1274 B- |
| – |
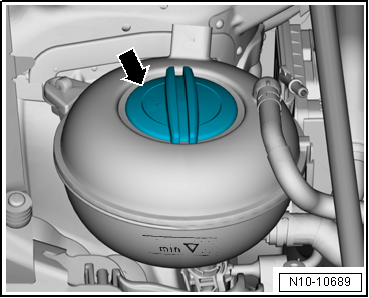
Open cap -arrow- on coolant
expansion tank. |
The cooling system is under pressure when the engine is hot. Hot
steam/hot coolant can escape - risk of scalding. Risk of scalding to
skin and body parts.Wear protective gloves.Wear eye protection.Release
pressure by covering cap of coolant expansion tank with a cloth and
opening it carefully.
| – |
Remove noise insulation
→ General body repairs, exterior; Rep. gr.66. |
| – |
Set drip tray for workshop hoist -VAS 6208- underneath. |
| – |
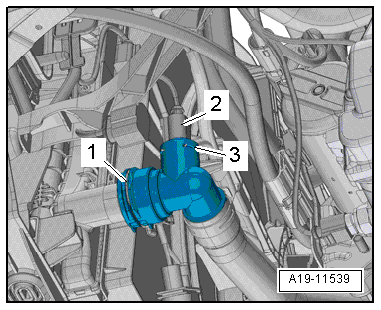
Disconnect connector -2- from
radiator outlet coolant temperature sender -G83--3-. |
|
|
|
| – |
Lift retaining clip -1-,
disconnect coolant hose from radiator (bottom left) and drain
off coolant. |
|
|
|
| – |
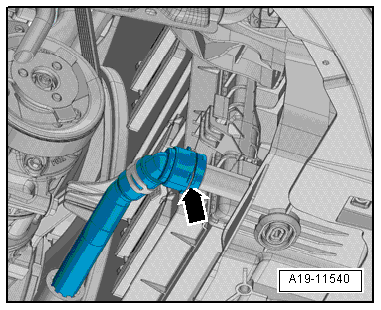
Lift retaining clip -arrow-,
disconnect coolant hose from water radiator (bottom right) for
charge air cooling circuit and drain off remaining coolant. |
 Note Note
| The water used in the coolant mixture has a great influence
on its effectiveness. Because the water quality differs from
country to country and even region to region, the quality of the
water to be used has been defined. Distilled water fulfils all
requirements. For this reason, we recommend using distilled
water when mixing coolant for topping up or replacing coolant. |
| Use only coolant additives which conform with the
→ Electronic Parts Catalogue (ETKA). Other coolant
additives may reduce corrosion protection substantially. The
resulting damage could lead to loss of coolant and subsequent
severe damage to the engine. |
| The correct coolant solution ratio helps prevent damage due
to freezing and corrosion as well as scaling. Moreover, the
boiling temperature is raised. Therefore, the cooling system
must be filled all year round with coolant additive. |
| Because of its higher boiling point, the coolant improves
engine reliability under heavy loads, particularly in countries
with tropical climates. |
|
|
|
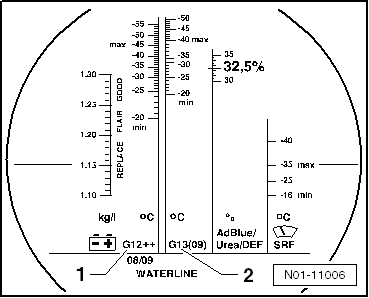
| ONLY refractometer -T10007A- may be used for determining
current anti-freeze value. |
| Frost protection must be guaranteed down to -25°C as a
minimum and, in countries with arctic conditions, down to
approx. -36°C. Increasing the frost protection is permissible
only if climatic conditions require stronger frost protection.
But only to -48°C. Otherwise, the cooling effect of the coolant
will be impaired. |
| The coolant concentration must not be reduced by adding
water even in warmer seasons and in warmer countries. The frost
protection must be at least -25°C. |
| Read off anti-freeze figures for respective replenished
anti-freeze. |
| The temperature read off the refractometer -T10007A- equates
to the »ice flocculation point«. Ice
crystals can start forming in the coolant below this
temperature. |
| Do not reuse old coolant. |
| Use only a water/anti-freeze mixture as a slip agent for
coolant hoses. |
|
|
|
| Frost
protection
to |
Coolant
additive concentration
|
Coolant
additive 1) |
Distilled water 1) |
| -25 °C
-36 °C |
40 %
50 % |
3.2 l
4.0 l |
4.8 l
4.0 l |
| 1) The quantity of coolant can
vary depending on the vehicle equipment. |
| Coolant:
→ Electronic Parts Catalogue. |
| – |
Connect coolant hose with plug-in connector to radiator
(bottom left)
→ Fig.. |
|
|
|
| – |
Connect coolant hose to water radiator for charge air
cooling circuit (bottom right) -arrow-. |
|
|
|
| – |
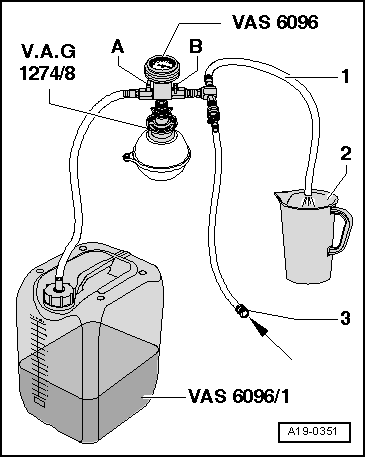
Fill coolant reservoir of -VAS 6096- with at least 10 litres
of pre-mixed coolant in correct mixture ratio: |
| – |
Screw adapter for cooling system tester -V.A.G 1274/8- onto
coolant expansion tank. |
| – |
Place cooling system charge unit -VAS 6096- on adapter -V.A.G 1274/8-. |
| – |
Feed vent hose -1- into a small
container -2-. |
Note
| Exhaust air takes a slight quantity of coolant along with
it; this should be collected. |
| – |
Close valves -A- and
-B- (turn lever transverse to
direction of flow to do this). |
| – |
Connect hose -3- to compressed
air. |
|
|
|
| – |
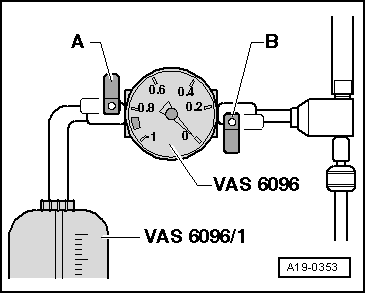
Open valve -B-; turn lever in
direction of flow to do this. |
| Vacuum is generated in the cooling system by the suction jet
pump; the needle of the gauge must move into green range. |
| – |
Also briefly open valve -A-
(turn lever in direction of flow to do this) so that hose on
-VAS 6096- coolant reservoir fills with coolant. |
| – |
Leave valve -B- open for a
further 2 minutes. |
| Vacuum continues to be generated in the cooling system by
the suction jet pump; the needle of gauge must remain in green
range. |
| The needle on the gauge should remain in the green range.
The vacuum level in the cooling system is then sufficient for
subsequent filling. |
Note
| If the needle does not reach the green zone, repeat the
process. |
| If the vacuum drops, the cooling system must be checked for
leaks. |
| – |
Pull off compressed air hose. |
| Vacuum in cooling system causes coolant to be extracted from
-VAS 6096- coolant reservoir and coolant system to be filled. |
| – |
Remove cooling system charge unit -VAS 6096- from coolant
expansion tank. |
|
|
|
| – |
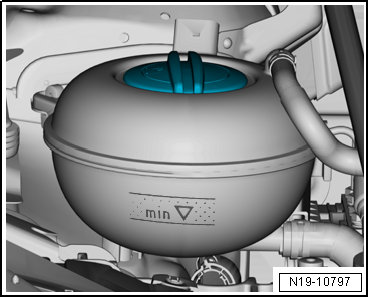
Fill coolant up to “max.” mark. |
| – |
Install noise insulation
→ General body repairs, exterior; Rep. gr.66. |
| – |
On vehicles with auxiliary heater, switch on auxiliary
heater for about 30 seconds. |
| – |
Set temperature regulator to “HI”. |
| – |
Switch off air conditioner compressor (press
AC button). |
| LED in the button must not light up. |
| – |
Start engine and run alternately at approx. 1,500 rpm to a
maximum of 2,800 rpm until radiator fan starts operating. |
| – |
Tighten cap of coolant expansion tank until it engages. |
| – |
Switch off engine and let it cool off. |
|
|
|
| – |
Screw adapter for cooling system tester -V.A.G 1274/8- onto
coolant expansion tank. |
| – |
Use cooling system tester -V.A.G 1274 B- to apply a pressure
of 1 bar to the cooling system. |
| – |
Use tester to relieve pressure and remove cooling system
tester -V.A.G 1274 B-. |
| – |
With the engine running, fill coolant up to approx. 5 mm
above max. mark. |
| The coolant level must be between the “min” and “max” marks
when the engine is cold. |
| The coolant level can be at or above the “max.” mark when
the engine is warm. |
|
|
|
Note
The arrows point in the direction of coolant flow.
The arrows on the coolant pipes and on the ends of the hoses
must ...
Special tools and workshop equipment
required
Cooling system tester -V.A.G 1274 B-
...
Other materials:
Volkswagen repair information
First read and observe the introductory information
and safety warnings Volkswagen Service information and official Volkswagen
repair information can be purchased from the following addresses:
Customers in Europe, Asia, Australia, Africa, Central and South America
Please contact a Volkswage ...
Removing and installing tyre pressure sensor, Siemens tyre pressure
monitoring system
WARNING
After tyre sealant has been used, the tyre pressure
sensor of the respective wheel must be renewed.
The Siemens system does not have a micro-encapsulated bolt.
...
Removing and installing reversing camera -R189-
Reversing camera and swivel motor are each installed in
individual housings together in swivel badge of rear lid. To
remove camera housing, remove first both components together
with swivel badge from rear lid. Afterwards, camera housing
together with sw ...
© 2016-2024 Copyright www.vwgolf.org

 Coolant hose schematic diagram
 Checking cooling system for leaks