Volkswagen Golf Service & Repair Manual: Assembly overview – battery, vehicles with high-voltage system
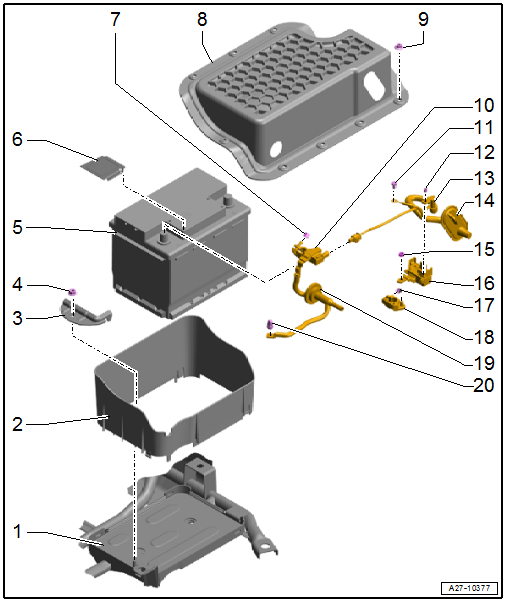
| 1 - | Battery tray |
| 2 - | Battery cover |
| 3 - | Retaining clip |
| 4 - | Nut |
| 20 Nm |
| 5 - | Battery -A- |
| Removing and installing → Chapter |
| Disconnecting and connecting → Chapter |
| 6 - | Cover |
| For negative battery terminal |
| 7 - | Nut |
| 6 Nm |
| 8 - | Cover for battery compartment |
| 9 - | Nut |
| Qty. 9 |
| 9 Nm |
| 10 - | Earth cable |
| With battery terminal clamp and battery monitor control unit -J367- |
| Removing and installing → Chapter |
| Disconnecting and connecting → Chapter |
| Adapting battery monitor control unit -J367- → Chapter |
| 11 - | Bolt |
| Specified torque → Item |
| 12 - | Nut |
| Specified torque → Item |
| 13 - | Positive cable |
| With wiring harness |
| Disconnecting and connecting → Chapter |
| 14 - | Grommet |
| 15 - | Nut |
| Specified torque → Item |
| 16 - | Fuse holder, battery |
| Overview of fitting locations → Chapter |
| 17 - | Nut |
| 6 Nm |
| 18 - | Battery terminal clamp |
| For positive cable |
| 19 - | Grommet |
| 20 - | Nut |
| 9 Nm |
 Assembly overview – battery, vehicles without high-voltage system
1 -
Retaining clip
2 -
Bolt
Specified torque: 15 Nm
3 -
Nut
Specified torque: 6 Nm
...
 Removing and installing battery, vehicles without high-voltage system
Special tools and workshop equipment
required
Torque wrench -V.A.G 1331-
...
Other materials:
Parking
Fig. 157 On the screen: static orientation
lines for the parking space behind the vehicle
First read and observe the introductory information
and safety warnings Overview of the orientation aid
The displayed green area ends on the road around 2 metres behind the vehicle.
Meaning of the ori ...
Removing and installing drive shaft, right drive shaft, constant velocity
joints VL100 and VL107, e-Golf
Special tools and workshop equipment
required
Torque wrench -V.A.G 1332-
Press tool -T10520-
...
Assembly overview - automatic anti-dazzle interior mirror, with rain and
light sensor -G397- and front camera for driver assist systems -R242-
1 -
Front cover
For mirror base
2 -
Retaining plate
For interior mirror
Bonded to windscreen
3 -
Rear cover
For mirror base
4 -
Interior mirror
Removing and instal ...
