Volkswagen Golf Service & Repair Manual: Assembly overview - transverse link, multi-link suspension, front-wheel
drive
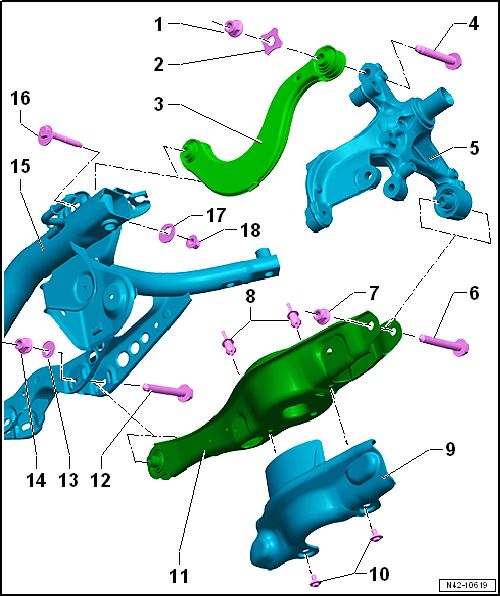
| 3 - |
Upper transverse link |
| Removing and installing
→ Chapter |
| Always tighten threaded connections in unladen position
→ Chapter |
| 5 - |
Wheel bearing housing |
| Always tighten threaded connections in unladen position
→ Chapter |
| 11 - |
Lower transverse link |
| Removing and installing
→ Chapter |
| A wheel alignment check must be performed if loosened
→ Chapter |
| Do not turn more than 90° in either direction (i.e. from minimum to
maximum adjustment position). |
| Always tighten threaded connections in unladen position
→ Chapter |
| A wheel alignment check must be performed if loosened
→ Chapter |
| Do not turn more than 90° in either direction (i.e. from minimum to
maximum adjustment position). |
| Always tighten threaded connections in unladen position
→ Chapter |
1 -
Washer
2 -
Nut
Renew after removing
3 -
Upper transverse link
Removing and instal ...
Other materials:
Removing and installing A-pillar trim
Special tools and workshop equipment
required
Removal wedge -3409
Torque wrench -V.A.G 1783
Removing
...
Tyres with flange protection
The tyre industry produces tyres with flange protection for
alloy wheels. The flange protection is intended to protect alloy
wheels from damage due to contact with kerbs.
The combination of tyres with flange protection, steel
wheels and ...
Assembly overview - deformable element
1 -
Front deformable element
2 -
Bolt
6.0 Nm
3 -
Rear deformable element
4 -
Bolt
6.0 Nm
...
© 2016-2024 Copyright www.vwgolf.org


 Assembly overview - transverse link, multi-link suspension, four-wheel drive