Volkswagen Golf Service & Repair Manual: Assembly overview - front brakes PC57 and C60
 Note Note
| After every brake pad change, depress brake pedal firmly
several times with vehicle stationary, so that brake pads are
properly seated in their normal operating position. |
| Use the brake filling and bleeding equipment -VAS 5234- to
draw off brake fluid from the brake fluid reservoir. |
| Before removing a brake caliper or disconnecting a brake
hose, fit brake pedal depressor -V.A.G 1869/2- (when doing this,
release pressure in system). |
| Assembly overview - front brakes PC57 and C60: |
|
|
|
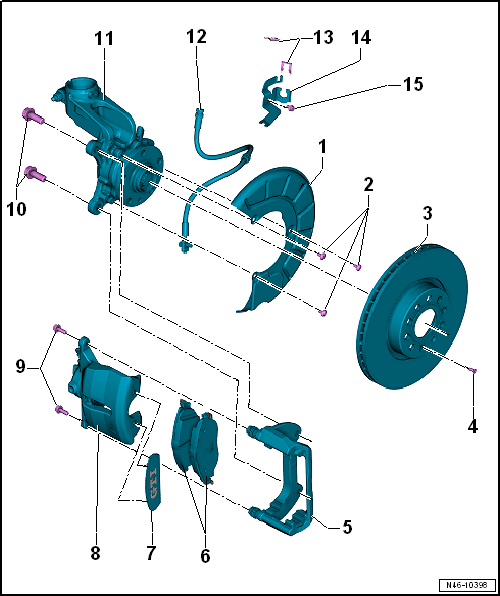
| Always renew on both sides of an axle. |
| Remove brake caliper and brake carrier prior to removing. |
| Apply thin coat of lithium grease G 052150 A2 to brake pad guide
surfaces. |
| Thickness: 14 mm not including backplate. |
| With front right brake pad wear indicator |
| When wear reaches a predetermined limit (approx. 4 mm), the warning
lamp in the dash panel insert comes on. Sensors can be renewed
individually. |
| Wear limit: 2 mm not including backplate. |
| Checking thickness
→ Booklet. |
| Always renew on both sides of an axle. |
| Removing and installing
→ Chapter |
| Allocation
→ Electronic Parts Catalogue (ETKA). |
| Do not disconnect brake hose when changing pads. |
| Removing and installing
→ Chapter |
| Allocation
→ Electronic Parts Catalogue (ETKA). |
| 9 - |
Hexagon bolt (self-locking) |
| Always renew after removing |
| 11 - |
Wheel bearing housing |
| With bolted brake carrier. |
| Allocation
→ Electronic Parts Catalogue (ETKA). |
| 12 - |
Brake hose with banjo union and banjo bolt |
| Ensure correct installation position |
Note
After every brake pad change, depress brake pedal firmly several
times with vehicle stationary, so that brake pads are properly seated in
their normal operating posi ...
Special tools and workshop equipment
required
Torque wrench -V.A.G 1331-
...
Other materials:
Removing and installing support for luggage compartment floor, saloon
Note
Removal and installation are described for the left vehicle
side. Follow same instructions for the right side as
appropriate.
Special tools and workshop equipment
required
...
Statutes and regulations
Note
The laws and regulations listed below are valid in the
Federal Republic of Germany. Other or additional laws and
regulations may apply in other countries.
Sources in other countries may be obtained from the
...
Tread depth and wear indicators
Fig. 202 Tyre tread: wear indicators
First read and observe the introductory information
and safety warnings Tread depth
Difficult driving situations demand the deepest possible tread depth for the
tyres and the same tread depth for the tyres on the front and rear axles. This applies
in ...
© 2016-2024 Copyright www.vwgolf.org

 Assembly overview - FS III front brake
 Removing and installing brake pads, FS III front brake